LOG SENSOR DATA FROM ESP32 TO AT24C256 I2C EEPROM
In this tutorial, you will learn how to log sensor data from several sensors -MPU6050 and BMP 180- to an EEPROM module from an ESP32 module
This tutorial assumes prior working knowledge with Arduino IDE or Platform IO
1.1 Introducing EEPROM
EEPROM (Electrically Erasable Programmable Read Only Memory) is a Electrically Erasable Programmable Read-Only Memory (EEPROM) is a steady, non-volatile memory storage scheme that is used for storing minimal data quantities in computer and electronic systems and devices, such as circuit boards. By applying a higher-than-normal voltage, data can be erased and be reprogrammed to it.
Electrically Erasable Programmable Read Only Memory (EEPROM) is a type of user modifiable ROM that can be erased and reprogrammed (written to) repeatedly by applying an electrical voltage that is higher than normal. It enables individual bytes of data to be erased and reprogrammed.
EEPROM need not be taken out of the computer or electronic device of which it is part when a new program or information or data needs to be written on it. The client/user can change the quality of certain units without expecting to erase the programming on different cells. Consequently, areas of data might be erased and replaced without expecting to adjust whatever rest of the chip programming. Data saved in an EEPROM chip is permanent, until the client chooses to delete and replace the data that it contains. The information saved in an EEPROM chip is not lost even when power is turned off. Here only one external power supply device is used. Write and erase operation are performed on byte basis.
1.2 Introducing the modules
1.2.1 ESP32
For this project, we shall be using the ESP32 Devkit V1 module. The pin out for the board is as shown below:

1.2.2 AT24C256 module
The AT24C256 I2C EEPROM is a 32Kb EEPROM module that communicates through a common two wire bus (I2C). It can allow up to 4 devices to share a common bus.
It is optimized to low power low voltage operations and is available in 2.7V (2.7V -5.5V) and 1.8V (1.8V - 3.6V) versions.
The datasheet for this module can be found at : https://ww1.microchip.com/downloads/en/devicedoc/doc0670.pdf
The pin-out and pin configuration table for AT24C256 are as shown below


1.2.3 BMP180
The BMP180 is a precision sensor for measuring barometric pressure and temperature. From the laws of physics, pressure changes with changes in altitude and as such the altitude of any place can be estimated almost accurately.
The BMP180 is designed to be connected directly to a microcontroller of a mobile device via the I2C bus.

1.2.4 MPU 6050
The MPU-6050 IMU (Inertial Measurement Unit) is a 3-axis accelerometer and 3-axis gyroscope sensor with an embedded temperature sensor. The accelerometer measures the gravitational acceleration and the gyroscope measures the rotational velocity.
The gyroscope measures rotational velocity (rad/s) to determine the orientation of an object.
The accelerometer measures acceleration by sensing static forces like gravity or dynamic forces like vibrations or movement

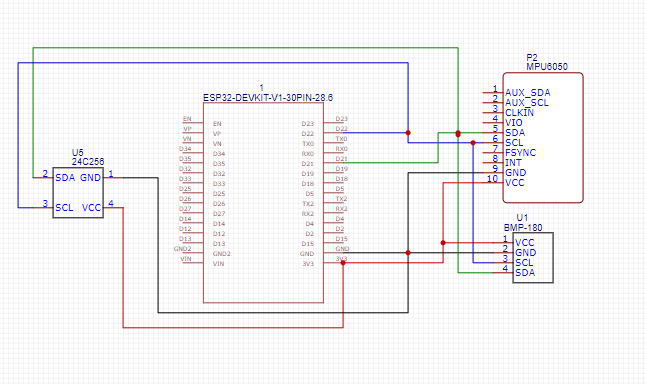
1.3 Connection schema
We connected the sensors (BMP180 and MPU6050) and EEPROM module to the ESP32 as shown in the schema below:
1.4 Installing libraries
The following libraries are to be added to effectively read data frm sensors and write /read from EEPROM:
Adafruit_BMPO85.h
Adafruit_MPU6050.h
Adafruit_Sensor.h
AT24C256.h
To install the libraries follow the next steps , based on the IDE you use.
On Arduino IDE
1) Click on Sketch > Include Library > Manage Libraries .

2) Once the Library Manager has opened, search for the particular library on the search box and install the library
On Platform IO
1) Open the PIO Home tab and click on New Project from Quick Access

2) Provide the name of your project
3) On the board dropdown, search for Devkit and select - DOIT ESP32DEVKIT V1
4) Set the framework to Arduino and click on Finish

5) Click on Libraries on the PlatformIO Home Page
6) Search the name of the library on the search box and click on it to open it

7) Click on Add to Favourites , Select the project you wish to use the library on and add

NOTE:
When downloading the AT24C256 library, download the version by Paul Gaudre :

1.5 Reading and writing sensor data
The code snippet of the project is as provided below.
Access the full code from our Github repo


1.6 Disadvantages of EEPROM
a) Limited space - EEPROM capacity is measured in bits and not bytes. A 256K EEPROM will hold 256Kbits of data, in other words, just 32KB. Currently available modules have a maximum size of 32KB, which may not be enough for the intended use.
b) Limited rewrite times - During rewrite operations, the bit cells in EEPROM get stuck in the programmed state. This happens because the FGT accumulates trapped electrons. As more electrons get trapped, the threshold for the "zero state" cannot be detected, and the cells remain permanently in the programmed state, which may result in chip failure. There’s thus a maximum and minimum number of rewrite cycles.
c) Finite data retention time - The EEPROM architecture is set up to allow electrons injected into the floating gate to drift through the insulator, which is not a perfect insulator. This floating causes some charge to be lost, which results in some data getting erased and the memory cell reverting to its erased state. There’s thus a finite data retention time as defined by the manufacturer usually 20 - 100 years

Comments
Post a Comment